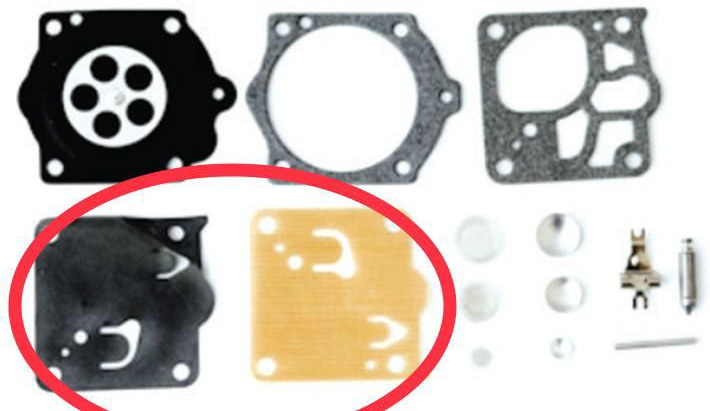
When fitting a carb kit to a Walbro or Tillotson diaphragm type carb, you will notice that they supply two pumper membranes.
A black one and a tan colour one. These two are made of very different materials.
Why a choice of two and which one to use?
The black one is for standard petrol.
The tan one is made for high ethanol fuel, as used in some countries (but not South Africa).
So use the black one, but keep the tan one for when the black one starts to fail, this will delay the need to buy another carb kit.
This pumper membrane is usually the first thing to fail inside the carb, usually long before the needle-valve.
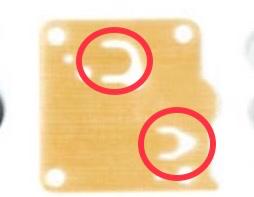
It has usually two little “fingers” that lie flat against a hole in the carb body and act as one-way flap valves, part of the fuel pump system to suck the fuel up from the tank against gravity. Over time, these fingers get distorted and lose there shape. They tend to not lie flat against the hole that they need to seal off. This leads to partial fuel starvation and poor running. When this happens, open the pump side of the carb only (opposite side to the metering diaphragm), clean out the mesh filter by scraping it with a matchstick and remove the bundle of accumulated dirt, then swap out the old black pumper membrane with the tan colour one. This will extend the service life of the carb kit. By the time the tan colour pumper membrane starts to fail, you will need a complete new carb kit anyway, as by then the other parts will be starting to wear out.
There is a gasket that fits against this membrane. But on which side? Do you put the gasket on first and then this membrane, or the other way round?
Well its easy to determine which sequence is correct. Those two fingers must lie flat against the holes that thet cover on the carb body. If you put the gasket down first and then the membrane, then the gadget lifts the membrane off the carb body, which means the fingers cannot seal off the holes. The fuel pump will not function properly and the motor will run very lean and rough. So its first the membrane against the carb body, then the gasket and then the metal cover.
So use the black one, but keep the tan one for when the black one starts to fail, this will delay the need to buy another carb kit.
This pumper membrane is usually the first thing to fail inside the carb, usually long before the needle-valve.
It has usually two little “fingers” that lie flat against a hole in the carb body and act as one-way flap valves, part of the fuel pump system to suck the fuel up from the tank against gravity. Over time, these fingers get distorted and lose there shape. They tend to not lie flat against the hole that they need to seal off. This leads to partial fuel starvation and poor running. When this happens, open the pump side of the carb only (opposite side to the metering diaphragm), clean out the mesh filter by scraping it with a matchstick and remove the bundle of accumulated dirt, then swap out the old black pumper membrane with the tan colour one. This will extend the service life of the carb kit. By the time the tan colour pumper membrane starts to fail, you will need a complete new carb kit anyway, as by then the other parts will be starting to wear out.
There is a gasket that fits against this membrane. But on which side?
Do you put the gasket on first and then this membrane, or the other way round?
Well its easy to determine which sequence is correct. Those two fingers must lie flat against the holes that thet cover on the carb body. If you put the gasket down first and then the membrane, then the gadget lifts the membrane off the carb body, which means the fingers cannot seal off the holes. The fuel pump will not function properly and the motor will run very lean and rough. So its first the membrane against the carb body, then the gasket and then the metal cover.
After replacing all the parts in the carb, you might find a few new parts left over from your carb kit. Don’t panic, you did not miss something. Some carb rebuild kits are made to fit a number of different carbs and therefore have a few extra bits and pieces in them to cover a wider range of carbs, so depending on which model carb you have, you might have some components from the kit that are not for your specific carb. Feel free to discard them.
There are two types of carb kits:
(a) carb gasket kit which contains only the diaphragm, pumper membrane and gaskets, and
(b) carb rebuild kit which contains the above plus all the other working buts too, most notably a replacement valve-needle, its rocker arm aka lever, the spindle (hinge) for the lever and usually a few more pieces such as Welch Plugs, circlips, etc.
I strongly recommend that you buy the full rebuild kit and replace everything inside the carb at each carb service, which should be done approximately every 50 to 100 hours when you start having starting problems and poor idling and rough running